1 Download and install OpenBVE
- 1.1 System requirements
- 1.2 Download files from Internet
- 1.3 Install OpenBVE
- 1.4 Install a route and a train
- 1.4.1 General
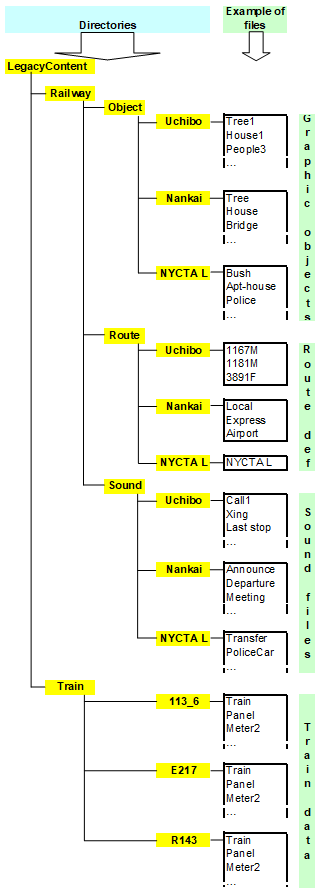
- 1.4.2 Structure of directories and files
- 1.4.2.1 The
Legacy Content
directory - 1.4.2.1.1 The directory LegacyContent\Railway
- 1.4.2.1.1.1 The directory LegacyContent\Railway\Object
- 1.4.1.2.1.2 The directory LegacyContent\Railway\Route
- 1.4.2.1.1.3 The directory LegacyContent\Railway\Sound
- 1.4.2.1.2 The directory LegacyContent\Train
- 1.4.3 Download and install a route
- 1.4.4 Download and install a train
- 1.5 Check the function
1.1 System requirements
There is no official minimum nor recommendended system requirements posted at the OpenBVE official website. However, practical experience gives a clue on what is required:
- CPU: Intel Core i5-8400 (6 cores) @ 2.8 GHz (3DMark CPU profile @ max threads score 3665) or better
- Memory: 8 GB
- Hard disk: A basic installation requires almost 80 MB of free space, to accommodate some 20 additional routes requires at least 400 MB free space
- Graphics card: NVIDIA GeForce GTX 1070 or equivalent with 8 GB (3DMark graphics score 6050) or better
- Sound card: OpenAL compatible
- Operating system: Windows 10 (there are OpenBVE versions for Linux and MacOS-X, which are not covered by OpenBVE.net)
- .NET ver 4.6.1
This nowadays rather modest setup was tested with OpenBVE ver 1.9.1.1 and renders routes with high
graphical details, such as the route Birmingham X-city South
station Birmingham New Street
, without lagging at highest graphic quality settings in OpenBVE
(full screen resolution 1920 x 1080, 32 bits/pixel, 16 levels of anisotropic filtering,
16 levels of anti-aliasing and smooth transparency, viewing distance 1000 m).
Computers with less performance than the above recommended should however be possible to use for OpenBVE if the graphic quality settings in OpenBVE are lowered and/or less detailed routes are run.
1.2 Download files from Internet
Download the Windows installer file from the official OpenBVE download page.
Should .NET ver 4.6.1 not be installed at the computer, it also needs to be downloaded and installed. If that is needed or not, will be shown when installing OpenBVE, see section 1.3.
1.3 Install OpenBVE
You need to have administrator privileges on the Windows 10 computer on which you intend to install OpenBVE. If your user account do not have such privileges, you will be prompted to state the login name and password of an account which have administrative privileges on the computer.
Follow the instructions on the official OpenBVE install page. That page also includes a link to download and install .NET ver 4.6.1, should it be necessary.
1.4 Install a route and a train
1.4.1 General
Routes and trains for OpenBVE comes in various forms, it may be OpenBVE packages, installers or as file archives.
The easiest way to install a route or a train is if they are available as a OpenBVE package. OpenBVE handles them through the program's menu, and there is no need to manually put files in various locations.
Installers may or may not put files in the right locations. If they are made for OpenBVE, the installer usually puts the files in the right place. If the installer however was made for some version of the original BVE ver 2 or 4 program, they may put the route or train files in the wrong location for OpenBVE. Then they manually have to be moved to the right location in OpenBVE's file tree.
File archives usually contains the route or train files in some kind of structure. After extracting the files, they have to be put in the right location of the OpenBVE file tree.
1.4.2 Structure of directories and files
It is not necessary to know the structure of Open BVE directories and files to use the simulator if you only install routes and trains from OpenBVE packages. However, sooner or later, you may need this knowledge after downloading a route or a train for OpenBVE or BVE from Internet that comes with a flawed installer or just comes as a file archive. Then it is usually needed to manually move files to where they should be in OpenBVE's file tree.
In OpenBVE, legacy content
and managed content
are stored in separate directories in the data directory of
OpenBVE. Those subdirectories in the main
OpenBVE data directory are named LegacyContent
and ManagedContent
. Here, the directory structure for legacy content
is to be
explained, because it is in this class of routes and trains files may be misplaced and/or
need manual corrections.

Picture 1: Example of directory structure for the OpenBVE
legacy content directory with subdirectories. In this example, three routes (Uchibo, Nankai and
NYCTA L) are installed and
3 train types (113, E218 and R143).
1.4.2.1 The LegacyContent
directory
This is a subdirectory to your main OpenBVE add-on
directory, that by default has an absolute path C:\Users\Username\AppData\Roaming\OpenBVE\LegacyContent
.
In it are 2 subdirectories of interest: Railway
(described in section 1.4.2.1.1 below) and
Train
(described in section 1.4.2.1.2 below), each of them
with extensive contents.
1.4.2.1.1 The directory LegacyContent\Railway
The directory BVE\Railway contains all data of the routes. There are three subdirectories: Object
for graphic objects, Route
for route definitions, and Sound
for sounds.
1.4.2.1.1.1 The directory LegacyContent\Railway\Object
This directory contains subdirectories with graphic objects. Each usually route has its own subdirectory.
There are 2 kinds of files for the graphic objects: There are text files defining each
3D object, and there are bitmap images that make up the
textures of the 3D-object’s visible surfaces.
The bitmap images have the file name extension .bmp
. The
3D object definition text files in
OpenBVE may be coded in any of four formats:
- An old version with the file name extension
.b3d
- A newer version with the file name extension
.csv
- The newest version with the file name extension
.x
- For animated objects is a special type of definition files with the file name extension
.animated
1.4.2.1.1.2 The directory LegacyContect\Railway\Route
This directory contains subdirectories with route definitions for the various routes installed. Each route or set of routes usually has its own subdirectory. The route definitions in OpenBVE may be coded in any of two formats:
- An old version with the file name extension
.rw
- A newer version with the file name extension
.csv
A route definition is a text file containing a definition of the train’s route, which train to use and which graphic objects should be shown and their location relative to the train’s route. Locations of sound objects are also defined relative the train routes. Those are sounds not directly originating from the train driven, such as grade crossing bells, station announcements and various environmental sounds.
Sometimes you want to be able to drive the same line but according to different timetables for local trains calling at every station or express trains calling only at major stations along the line. For each such alternative a separate route definition is made by the routes’ author(s).
1.4.2.1.1.3 The directory LegacyContent\Railway\Sound
This directory contains subdirectories with sound files for the various routes. Each route or set of routes usually has its own subdirectory.
1.4.2.1.2 The directory LegacyContent\Train
In this subdirectory there are subdirectories for each train type and other kind of track vehicles installed in OpenBVE. These are only the trains that are supposed to be driven in a route. Those trains that you see in a route but not drive yourself are just graphic objects in that route.
The subdirectory of each vehicle contains text files describing the vehicle’s performance and other properties, but also a definition of how the driver’s stand should look in the cab view of OpenBVE. There are also a lot of sound files containing sound of motors, brakes, door opening and closing etc. A number of bitmap images for the cab view are also found in the vehicle’s subdirectory.
1.4.3 Download and install a route
The description here is about how to install an OpenBVE route package. The route to install is the Japanese Minobu line. It is available for download from this website. Use the link above to go to the catalogue page of the route and download the route package.
Once the route package is downloaded and saved localy on your computer, start the OpenBVE
program. Click on the button Package Management
and on the next page click the Install Package
button. On the next
page that opens, click the Select Package...
button. In the dialogue box that then opens, select the downloaded route
package Mibobu.zip
and click the Open
button.
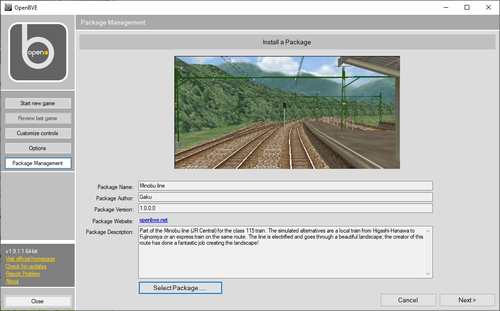
If things are ok, the screenshot from the route shown in the catalogue should be displayed along with some other information.

Picture 2: Dialogue shown when a route package is selected to install.
Then click the Next >
button and the route should be installed. When the installation
has progressed to 100 %, click the Ok
button. You should now see a list where the Minobu line
is listed as installed.
1.4.4 Download and install a train
To drive a route in OpenBVE a train is needed. It is installed in about the same way as a route. Please take notice that even if you in OpenBVE can select any train with any route, there is a connection between a route and a specific train. That is because of the fact that the sound from rail and switches may mismatch between the definition of rail type numbers in the route file and the number of the rail type sounds in the train definition file. There have been tries within the route builder community to make a standard of rail type numbers, but only a few trains and routes follow any standard.
If you have installed the Minobu line according to the instructions in section 1.4.3, the corresponding train is the JR Central class 115-2000 EMU. It is available for download from this website. Use the link above to go to the catalogue page of the train and download the train package.
Once the train package is downloaded and saved locally on your computer, start the OpenBVE
program. Click on the button Package Management
and on the next page click the Install Package
button. On the next
page that opens, click the Select Package...
button. In the dialogue box that then opens, select the downloaded train
package 115-2000.zip
and click the Open
button.
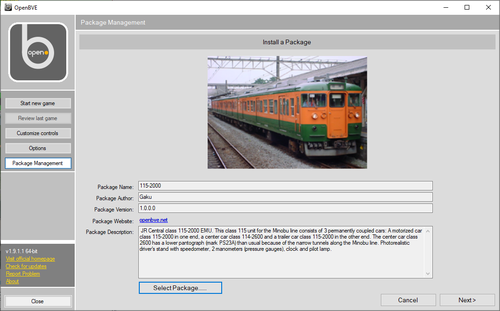
If things are ok, the picture of the train from the route shown in the catalogue should be displayed along with some other information.

Picture 3: Dialogue shown when a train package is selected to install.
Then click the Next >
button and the train should be installed. When the installation
has progressed to 100 %, click the Ok
button. You should now see a list where the
JR Central class 115-2000 EMU
is listed as installed.
1.5 Check the function
During the install, a start icon for OpenBVE is placed in the Windows Start menu (and on the desktop if you opted to create this). Use it to start OpenBVE if it is not already running.
If the installation was successful, a dialogue window will appear for selection of route and train.
If you installed the Minobu line as described in section 1.4.3 you should find a folder named Minobu
in the
route selection field. Double click that folder to open it. You will find a route named Minobu 115.csv
.
Select the default train for the Minobu line, that should be the JR Central class 115-2000
EMU installed in the description of section 1.4.4. To do so, in the
train selection field click the tab Route default
and check the box Use the train suggested
by the route (115-2000)
.
Click the Start
button to start the simulation.
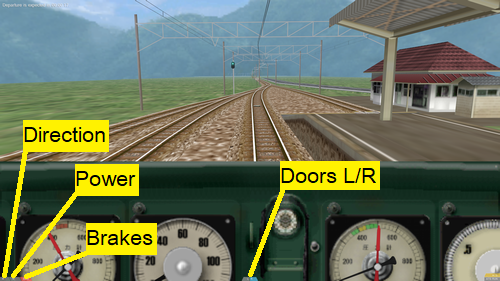
Now you should see a cab view with indicators and controls. To test that the controls work as they are supposed to, you only have to pay attention to these indicators and controls at this time:
In the bottom left part of the window there are 3 indicators, each of them semi-transparent with white text within:
- Indicator of direction to drive: The leftmost indicator
- Indicator for the power control: The indicator in the middle
- Indicator for the brakes: The indicator to the right

Picture 4: The cab view with controls and indicators mentioned in the text labeled
To check the keyboard controls of OpenBVE, do the following tests:
- The direction indicator indicates
N
for neutral. Press the F key at the keyboard. The indicator should now indicateF
for forward. Press the B key at the keyboard. The indicator should now indicateN
again. - The direction indicator indicates
N
. Press the B key at the keyboard again. The indicator should now indicateB
for backwards. Press the F key at the keyboard. The indicator should now indicateN
again. - The power control indicator indicates
N
. Press the Z key at the keyboard several times and check that the driving control indicator steps up fromP1
toP4
. Press the A key at the keyboard several times and check that the indicator steps down fromP4
toP1
and then toN
. - The brake indicator indicates
EMG
for Emergency Braking. Press the comma , key and check that the indicator steps down fromB8
toB1
and then toN
for none. Push the period . key at the keyboard several times and check that the indicator steps up fromP1
toP8
. - When checking the emergency brake, the brake indicator should indicate
EMG
when the - key is pressed at the keyboard.
The doors are automatically operated by a simulated conductor; left and right sides doors open are indicated
by blue background the letters L
and R
in the bottom center of the window.
To exit, press the Esc key to get a menu of alternatives, including Quit
.


 © Patrick Norqvist